You've seen them. Even if you didn't have a name for them until five minutes ago, you’ve definitely seen them. The "Utah Curl" has become the unofficial uniform of Salt Lake City influencers, Mormon Mommy bloggers, and basically every contestant on The Bachelor for the last three seasons. It’s a very specific look. You have these tight, bouncy, almost Victorian-looking ringlets through the mid-shaft of the hair, but the ends? Bone straight. It’s a polarizing aesthetic, honestly. Some people think it looks like you just gave up halfway through, while others swear it’s the only way to keep long hair looking "modern" and not like a 1980s prom queen.
The trend blew up on TikTok, often associated with the "Mormon Mom" aesthetic (hence the name), but the technique behind how to do Utah curls is actually a masterclass in tension and heat control. It’s not just a "lazy curl." If you do it wrong, you end up looking like George Washington. If you do it right, you get that specific, beachy-yet-polished vibe that stays for three days.
What Are Utah Curls, Exactly?
Let’s get the anatomy right. Most traditional curling methods involve wrapping the hair from the ends up to the root, or at least curling the entire strand. The Utah curl breaks that rule. It’s characterized by a flat, straight top (near the roots), a heavy, textured curl in the middle, and about two to three inches of dead-straight hair at the bottom.
People love it because it preserves length. When you curl your ends, your hair "shrinks." If you have waist-length hair and do a full spiral, suddenly you’re at shoulder length. By leaving the ends straight, you keep that visual length while adding volume and texture to the body. It’s also surprisingly durable in high-altitude, dry climates—like, say, Utah—where curls tend to fall out the second you step outside.
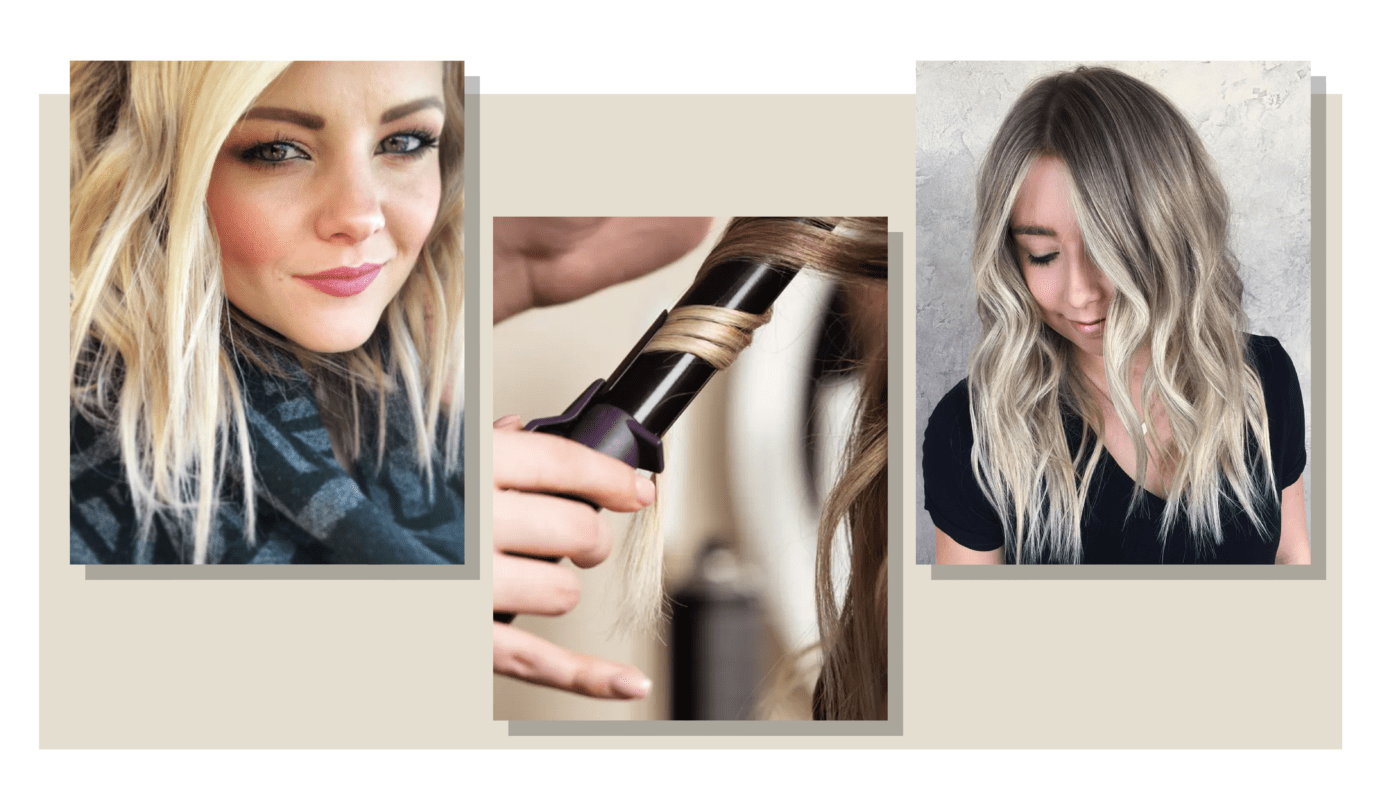
The Tool Kit You Actually Need
Don’t grab a bubble wand. Please. To get this look, you need a traditional curling iron with a clip (a marcel iron if you’re fancy, but a spring clip is fine).
- A 1.25-inch barrel: This is the goldilocks size. A 1-inch is too tight and starts looking like a Shirley Temple vibe, and a 2-inch won't hold the "bend" long enough.
- Heat protectant: Use something with a bit of "grit" or hold. Brands like Amika or Kenra make sprays specifically for hot tools that aren't too greasy.
- A wide-tooth comb: Do not use a brush. You’ll turn into a puffball.
- Texture spray: Salt spray is okay, but a dry texture spray (like Oribe or even the cheaper Kristin Ess version) is the secret sauce.
How to Do Utah Curls Without Looking Like a Colonist
Step one: Prep. Your hair shouldn't be squeaky clean. Slightly "lived-in" hair holds this style best. If you just washed it, blast it with some dry shampoo first to give the iron something to grab onto.
Sectioning is where most people mess up. You want vertical sections, not horizontal ones. Vertical sections create a more elongated, "hanging" curl rather than a stacked, voluminous look. Grab a piece about an inch wide.
The Technique
Start the iron about mid-way down the hair shaft. This is crucial. If you start too high, you get that "pageant" volume that the Utah look tries to avoid. Clamp the iron, roll it up toward the scalp once, and hold for literally three seconds. Then, as you release the clamp slightly, slide the iron down the hair, leaving that last two inches of the ends completely out of the iron.
Don't touch it.
Seriously. Let that hot ringlet sit there. If you run your fingers through it while it's hot, the "straight end" will blend too much with the curl, and you'll lose the contrast that defines the style. Repeat this around your whole head, always curling away from your face.
Why the Straight Ends Matter
It feels wrong. The first time you do it, you’ll look in the mirror and think, "I missed a spot." You didn't. That "fish tail" at the end is what makes it a Utah curl. It creates a silhouette that is more "A-line" and less "O-shape."
Stylist Bridget Brager, who works with plenty of celebs, has noted that leaving the ends straight is a trick used to make hair look healthier. Heat damage usually shows up most at the tips. By avoiding clamping the ends for long periods, you’re actually saving your hair from a lot of unnecessary breakage. Plus, it looks "undone." It’s that "I tried, but I didn't try that hard" energy.
Common Mistakes (And How to Fix Them)
- The "Crinkle": If you see a weird line where you first clamped the iron, you’re holding it too long or your heat is too high. Turn the iron down. You’re aiming for 325-350 degrees, not the 450-degree "burn your hair off" setting.
- Too Much Product: If your curls look "crunchy," you used too much hairspray before curling. Use a flexible hold spray after the hair has cooled down.
- The Front Pieces: The pieces framing your face should start even lower. You want the curl to start right at the cheekbone or jawline. This draws the eye down and elongates the face.
The Cool Down
Once your whole head is a forest of bouncy ringlets with straight tails, wait at least ten minutes. Go have a coffee. Do your makeup. Let the hydrogen bonds in your hair reset into that shape.
Now, take your wide-tooth comb or just your fingers. Flip your head upside down—this is the pro move—and shake it out at the roots. Don't comb through the ends too aggressively. Flip back up, spray some texture spray into the mid-lengths, and you’re done.
The Cultural Context of the Look
It's fascinating how a regional hair trend becomes a global standard. The Utah curl is inextricably linked to the "clean girl" aesthetic and the rise of influencer culture in the Mountain West. It’s a look designed to be photographed. Because the curls are so defined in the middle, they catch the light perfectly on camera, while the straight ends keep the hair looking long and lush in "Outfit of the Day" posts.
Critics often call it "The Mormon Glow-Up" hair, and while it originated in those circles, it has evolved. We're seeing variations now where the ends are slightly tapered or the curls are brushed out into "S-waves," but the core principle remains: volume in the middle, straight at the bottom.
Practical Next Steps
If you’re ready to try this, start with day-old hair. It has more natural oils which act as a buffer against the heat. Make sure your iron is completely clean; any old hairspray buildup on the barrel will snag those straight ends and ruin the smooth finish.
Grab a 1.25-inch curling iron and a heat-resistant comb. Practice the "slide-down" motion without the iron turned on first to get the muscle memory of leaving the ends out. Once you nail the timing—usually about 4-6 seconds per section—the whole head shouldn't take more than 15 minutes. Use a dry texture spray rather than a traditional aerosol hairspray to maintain that "fluffy" look without the stiffness. Check your profile in a hand mirror to ensure the curls start at the same height on both sides, as asymmetry is the quickest way to make this look accidental rather than intentional.